


Your cutting board is more than just a kitchen tool—it’s the heart of your meal prep. But without proper care, it can dry out, crack, or even harbor bacteria.
Knowing how to oil a cutting board is a simple step that keeps it looking great and lasting longer. In this guide, you’ll discover easy tips to protect your board and keep it ready for every chop, slice, and dice.
Ready to give your cutting board the care it deserves? Let’s get started.
Choosing The Right Oil
Choosing the right oil for your cutting board is very important. The oil protects the wood from cracking and drying out. It also keeps the board looking fresh and clean. Not all oils work well for cutting boards. Some oils can go bad or even harm the wood.
Using the right oil helps your cutting board last longer. It keeps the wood strong and safe for food. Knowing which oil to pick makes a big difference in care and maintenance.
What Makes A Good Cutting Board Oil?
A good cutting board oil should be safe for food contact. It must soak into the wood easily. The oil should not leave a sticky surface. It needs to protect the board from water damage and stains. A good oil does not go bad quickly.
Mineral Oil: The Best Choice
Mineral oil is popular for oiling cutting boards. It is odorless and tasteless. It soaks into wood well and does not go rancid. Mineral oil is easy to find in stores. It is affordable and safe for food use.
Oils To Avoid
Vegetable oils like olive or canola can spoil. They leave a sticky, smelly surface. These oils can cause the wood to become sticky. Avoid any oil that can go rancid or attract insects.
Other Safe Oils For Cutting Boards
Tung oil and beeswax are safe options too. They create a strong, water-resistant finish. These oils last longer than mineral oil. They need to be applied less often.
When To Oil Your Board
Oiling a cutting board keeps it strong and safe for food. Knowing when to oil your board helps it last longer. It stops the wood from drying out and cracking.
Different signs tell you the right time to oil your board. Paying attention to these signs keeps your board healthy.
After Washing And Drying
Oil your board once it is clean and dry. Washing removes dirt and food bits. Drying stops moisture from staying in the wood. A dry board soaks oil better.
When The Wood Looks Dry
Check the surface for dryness. A dry board looks dull and rough. It may feel rough to touch. Oiling adds moisture and shine back to the wood.
After Heavy Use
Use your board a lot? Oil it more often. Heavy use wears down the wood. Oiling repairs small cuts and scratches. It keeps the board smooth and safe.
Seasonal Changes
Dry air in winter can dry out wood. Oil your board more during cold months. This protects it from cracking and warping. Keep your board ready for use year-round.
Preparing The Cutting Board
Preparing the cutting board is the first step to keep it in good shape. A clean and dry board absorbs oil better. This helps protect the wood and extend its life.
Start with a quick clean. Remove crumbs, food bits, and dirt. Use warm water and mild soap. Avoid soaking the board to prevent warping.
After washing, dry the board completely. Use a clean towel or air dry. Moisture can stop the oil from soaking in properly.
Remove Old Residue
Check the board for old oil or food stains. Use fine sandpaper to rub the surface gently. This clears away old residue and smooths rough spots. Sanding helps the new oil penetrate evenly.
Disinfect The Surface
Disinfect the board to kill germs. Use a mix of white vinegar and water. Spray or wipe the surface lightly. Let it sit for a few minutes, then rinse and dry well.
Check For Cracks And Splits
Look closely for cracks or splits. Small cracks can trap bacteria and dirt. Fix minor damage with wood filler or sand it smooth. A healthy surface absorbs oil better and lasts longer.
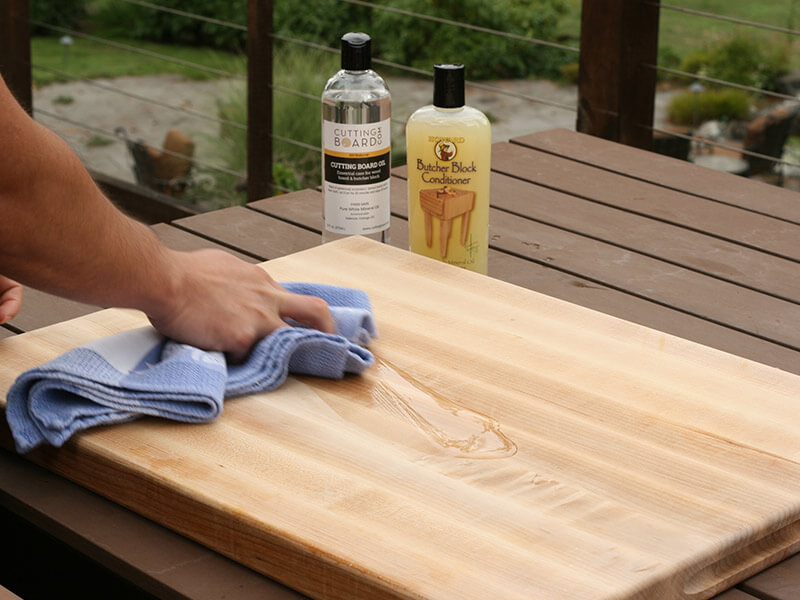
Applying Oil Correctly
Applying oil correctly on a cutting board keeps it safe and lasts longer. It stops wood from drying out and cracking. Proper oiling also helps the board resist stains and smells.
Follow these simple steps to apply oil the right way. They help your cutting board stay smooth and strong.
Choose The Right Oil
Use food-safe oil like mineral oil or beeswax oil. Avoid vegetable oils because they can go bad and smell.
Mineral oil soaks into the wood well and protects it from water.
Clean And Dry The Board First
Wash the board with warm water and soap. Dry it completely before oiling.
Oiling a wet board traps moisture and can cause damage.
Apply A Thin, Even Layer
Use a clean cloth or paper towel to spread the oil. Cover every surface, including edges.
Too much oil can make the board sticky. Use just enough to soak in.
Let The Oil Soak In
Leave the board to absorb the oil for at least two hours. Overnight is better.
Absorption keeps the wood healthy and prevents cracking.
Wipe Off Excess Oil
After soaking, wipe away extra oil with a clean cloth. This stops the board from feeling greasy.
Excess oil can attract dust and dirt.
Removing Excess Oil
Removing excess oil from your cutting board is important after oiling. It helps keep the board clean and prevents sticky spots. Excess oil can attract dirt and dust, which may cause damage over time.
Proper removal also ensures the oil soaks evenly into the wood. This keeps the board smooth and safe for food preparation. Follow these simple steps to remove extra oil easily.
Use A Clean, Dry Cloth
Take a soft, dry cloth or paper towel. Gently wipe the board’s surface in circular motions. This picks up the extra oil without rubbing it in again. Change the cloth if it becomes too oily.
Let The Board Rest
After wiping, let your cutting board sit for at least an hour. This gives the oil time to soak deep into the wood. During this time, avoid using the board or adding more oil.
Repeat If Needed
Check the board after resting. If it still feels sticky or oily, wipe it again. Sometimes a second wipe helps remove all the excess oil. This keeps your board clean and ready to use.
Drying Time And Conditions
Oiling a cutting board is only half the job. Drying time and conditions matter a lot. Proper drying keeps your board safe from damage and bacteria. It also helps the oil soak in well, making the board last longer.
Ideal Drying Time For An Oiled Cutting Board
Let the board dry for at least two hours. Some oils need more time, up to 24 hours. Give the oil enough time to soak deep into the wood. Rushing the drying can leave the surface sticky or oily.
Best Conditions For Drying Your Cutting Board
Choose a warm, dry spot with good air flow. Avoid direct sunlight; it can dry the board too fast. Keep the board flat or standing on its edge. This stops moisture from getting trapped underneath.
Signs Your Cutting Board Is Fully Dry
The board feels smooth and not sticky. Oil no longer pools on the surface. The wood looks richer and darker. If these signs appear, the board is ready to use or store.
Frequency Of Oiling
Oiling a cutting board keeps it strong and safe. It stops the wood from drying and cracking. Oiling also helps stop stains and bad smells.
The right oiling schedule depends on how often you use the board. Regular oiling keeps the board smooth and clean.
Oiling For New Cutting Boards
New cutting boards need oiling before first use. Apply oil evenly and let it soak overnight. This step protects the wood from water damage early on.
Oiling After Heavy Use
Boards used daily need oiling every week or two. Heavy chopping wears the surface quickly. Oiling restores moisture and stops cracks.
Oiling For Light Use
Boards used less often need oiling once a month. This keeps the wood healthy without extra effort. Check for dryness or rough spots before oiling.
Signs Your Board Needs Oiling
Look for dry or dull wood surfaces. Small cracks or rough patches also show the need. Wood may look lighter or feel rough to touch.
Avoiding Common Mistakes
Oiling a cutting board keeps it strong and clean. Many people try it but make simple errors. These mistakes can damage the wood or cause it to dry out. Avoiding these errors helps your board last longer and look better.
Use The Right Oil
Choose food-safe mineral oil or special cutting board oil. Avoid cooking oils like olive or vegetable oil. These oils can turn rancid and smell bad. Using the right oil protects the wood and your food.
Apply Too Much Oil
Putting too much oil leaves the board sticky. The wood will not soak it in well. Use a small amount and rub it in evenly. Let the board absorb the oil before adding more.
Not Cleaning The Board First
Oiling a dirty board traps germs and dirt. Always wash and dry your board fully before oiling. This keeps your board safe and clean for food prep.
Skipping Regular Oiling
Oiling once is not enough. Wood dries out over time and cracks. Oil your board every few weeks or when it looks dry. Regular care keeps it smooth and strong.
Using The Wrong Cloth
Use a clean, soft cloth to apply oil. Rough cloths can scratch the wood. Avoid paper towels that leave bits behind. A soft cloth helps the oil soak in well.
Cleaning Before And After Oiling
Cleaning your cutting board before and after oiling keeps it safe and long-lasting. Dirt and food bits can stop the oil from soaking in well. After oiling, cleaning helps remove extra oil and dirt. This step protects the wood and keeps your board fresh for the next use.
Cleaning Your Cutting Board Before Oiling
Start by washing the board with warm water and soap. Use a scrub brush or sponge to remove food particles. Rinse the board thoroughly to get rid of soap. Dry the board with a clean towel or let it air dry completely. Never oil a wet board. Oil won’t soak in well and may cause damage.
Cleaning Your Cutting Board After Oiling
Leave the oil to soak in for a few hours or overnight. Use a clean cloth to wipe off any extra oil on the surface. Avoid washing the board immediately after oiling. This lets the oil protect the wood properly. If the board feels sticky, wipe it gently until smooth.

Maintaining Different Wood Types
Different wood types need different care when oiling cutting boards. Each wood absorbs oil in its own way. Some woods soak up oil fast. Others take more time. Understanding these differences helps keep your board safe and healthy.
Oiling protects wood from drying out and cracking. It also stops stains and odors. Using the right oil amount matters. Too much oil leaves a sticky surface. Too little lets the wood dry. Let’s explore how to care for popular wood types.
Hardwoods: Maple And Walnut
Hardwoods like maple and walnut are dense and strong. They absorb oil slowly. Apply a thin layer of mineral oil. Let it soak for at least an hour. Wipe off any extra oil with a clean cloth. Repeat every few weeks for best results.
Softwoods: Pine And Cedar
Softwoods absorb oil quickly. They need less oil than hardwoods. Use a light coat of mineral oil. Let it absorb for 30 minutes. Wipe off any oil that stays on the surface. Oil softwood boards more often because they dry fast.
Bamboo Boards
Bamboo is a grass, not wood. It is harder than many woods. Bamboo boards take oil well but need less. Use a small amount of oil. Spread it evenly and let it sit 1 hour. Wipe off excess oil to avoid stickiness.
Exotic Woods: Teak And Rosewood
Exotic woods like teak and rosewood contain natural oils. They need less frequent oiling. Clean the board first. Apply a thin layer of oil. Let it soak overnight if possible. Remove any leftover oil to keep the surface smooth.
Signs Your Board Needs More Care
Taking care of your cutting board keeps it safe and lasts longer. A board that needs oiling shows clear signs. Knowing these signs helps you keep the board in good shape. Watch your board closely. It may be time to give it more care.
Dryness And Cracks
Look for dryness on the surface. The wood may look dull or faded. Small cracks can appear. These cracks let water and bacteria in. Oiling fills these cracks and stops damage.
Water Absorption
Drop some water on your board. If the water soaks in fast, the wood is dry. A well-oiled board repels water. Quick absorption means your board needs oil soon.
Rough Or Splintered Surface
Run your hand over the board. Rough or splintered wood can hurt your hands. It also traps food particles. Oiling smooths the surface and keeps it safe.
Fading Color
Notice if the board looks pale or dull. Fresh oil brings back rich color and shine. Fading means the board is thirsty and needs care.
Extending Board Lifespan
Oiling a cutting board helps keep it strong and healthy for years. Wood can dry out and crack over time. Regular oiling stops this damage and keeps the board smooth.
Oiling also protects the wood from water and stains. A well-oiled board stays clean and looks good. It saves money by preventing the need to replace the board often.
Preventing Cracks And Warping
Wood absorbs oil, which keeps it moist and flexible. Dry wood can crack or warp with use. Oiling fills tiny gaps in the wood. This stops water from getting inside and causing damage. A smooth surface lasts longer and feels better to use.
Reducing Bacteria Growth
Oiled boards repel water and food particles. This makes it harder for bacteria to grow. A dry board is rough and traps germs easily. Regular oiling keeps the surface sealed and safer for food prep.
Maintaining Appearance And Texture
Fresh oil brings out the wood’s natural color. It gives the board a warm, rich look. The board stays smooth and easy to clean. No rough patches or splinters appear with proper care.
Frequently Asked Questions
How Often Should I Oil My Cutting Board?
Oiling your cutting board once a month keeps it smooth and prevents cracking.
What Type Of Oil Is Best For Cutting Boards?
Use food-safe mineral oil or beeswax oil to protect and hydrate wood boards.
Can I Use Olive Oil To Oil My Cutting Board?
Olive oil can go rancid and is not recommended for cutting boards.
How Do I Know When My Cutting Board Needs Oiling?
If the board looks dry or water soaks in quickly, it needs oil.
Should I Clean My Cutting Board Before Oiling?
Yes, always clean and dry the board fully before applying oil for best results.
Conclusion
Oiling a cutting board keeps it strong and clean. Regular care stops cracks and warping. Use food-safe oil and apply it evenly. Let the oil soak in well before use. This simple step helps your board last longer. A well-oiled board looks good and works better.
Small efforts protect your kitchen tools every day. Keep your cutting board ready for all your cooking. Easy care makes a big difference over time.